Szóval valaki jó lenne, ha ehhez, amit belinkelek az Ultramini kamera/fényképezőgép-hez valamilyen Használati utasítást tudna adni!!
Ugyanis-ugyanis, rendben, hogy van hozzá egy kínai melléklet, de ez, amit kértem, még az is kiváló lenne, ha akinek otthon van ilyen és mondjuk felvenné, hogy "mi hogy" és akkor azt feltölti!!
Egy olyanra gondolok egyébként, mint a Kulcstartóba rejtett kamera 808 használata és bemutatása a Youtube-on!
Sziasztok, Van egy Canon 30D gépem és rendeltem programozható chipes adaptert DC632 M42 -> EOS külföldről. http://www.ebay.com.au/…/EMF-AF-Confirm-Adapt…/311456305898… A blende értékét tudom állítani, viszont a nem akar belépni a programozási üzemmódba. Próbáltam már többféle záridővel, illetve a 1/3 step be van állítva F/64-shutter + F/57- shutter + F/64 kombinációkat elkattintottam, de F1,4 alá nem tudok menni. Azt írja a programozási útmutató (találtam többféle verizót de ebben megegyeznek) akkor sikerült beállítani a programozási módot, ha sikerül F1-es értéke állítani. Az eladótól azt az infót kaptam keressek a google segítségével. Valakinek van valami ötlete, tippe mit próbáljak ki. Köszi!
kérdésem hogy van e valakinek tapasztalata erről vagy valami hasonlóról, illetve ha valaki segítene hogy ez hogyan is működik.
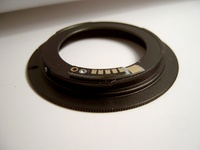
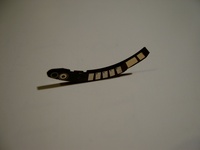
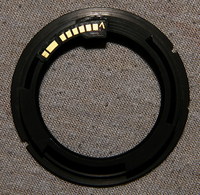
Valahogy nem tiszta nekem, találtam olyan képeket ami a másik felét mutatja, vagyis a menetes felét és ott semmilyen érintkezőt adatátviteli dolgot nem látok, csak a hátsó felén a kis gömb érintkezőket. Akkor ez most tulajdon képen hogyan működik?
Szervusz! Saját szórakoztatásomra vannak példányok. Meg tisztelt partneremtől a visszavett példányok, javítandók, stb. Van M42-EOS peremes adapterem chippel (5000 Ft) és anélkül (2500 Ft), 1-2 db. Fix programozású a chip. Nagyon ajánlhatom a Y/C-EOS chipes adaptereket, több példányt használok. Programozható chipen van 1 db, még nem használtam. Perem nélküli adapter is van egy, nem eladó. Néha, pl. Takumar M42 obiknál szükséges, ahol hátul kiálló dolgok vannak, amik akadnak a peremmel. Üdv.
Nem hasonlítottam össze Viktor Lushnikov programozási utasítását a ROXSEN féle kínai utasítással, de az angol "dandelion" szó árulkodik, ez a pitypang virág angolul, Lushnikov így nevezi találmányát, "oduvancsik" oroszul. A kínaiak vagy egyszerűen átvették Lushnikov utasítását, vagy ez a Lushnikov által is Kínában gyártatott chip ügy egyik legális oldalága.
Ha nem bírod Puskin nyelvét, akkor ánglius nyelven a kínai ROXSEN programozási utasítása (hasonló van az orosz honlapon is):
Product Features: This adapter can allow your use any m42 mount lens in all of Canon EOS mount DSLR Camera. With this new EMF adapter. Beside you can obtain focus confirmation red light, and bee sounds. You also can set the aperture infomation.
The camera can be changed on a dandelion aperture in interval from F1.1 to F45 The camera can be changed on a dandelion focal length in interval from 1mm to 65535mm Date can be save even turning off the camera When focus is correct, there will be an indicator of red light and a sound singal that will prove chosen focus You can use in Av or M mode.
Method for setting program:
1. Setting the maximum aperture on lens 2. Setting the desired aperture on camera 3. Focus and meter the object, when focus is achieved. 4. Setting the lens aperture to the same desired aperture as the camera setting 5. Press the shutter button and take the picture. And you can also: 1. Setting the maximum aperture on lens 2. Setting the aperture value on camera to maximum lens aperture 3. Focus and meter the object, when focus is achieved. 4. Setting the lens aperture AND the camera aperture setting to the desired aperture. 5. Press shutter button and take the picture
Shot and not recording exposure aperture setting 1. Setting the aperture value on camera to the lens’ maximum aperture 2. Setting the camera to AV mode 3. Setting the desired aperture on lens 4. Focus and meter the object and take the picture., Exposure aperture data recorded in EXIF is the lens’ maximum aperture.
How to Set Up this emf chip Adapter 1. Attach the adapter to the lens and attach the lens to the camera when camera is powered off. Power on the camera and set the camera to Manual mode. Set the camera in single shoot drive mode. Set the shutter speed to 1/60 second and aperture increment step to 1/3 EV. Notice: Do not set the camera in continuous shooting mode to avoid misopertations. only set it in single shot 2. Turning the aperture setting dial and set the aperture value to F/64 and press shutter button once. 3. Turning the aperture dial and set the aperture value to F/57 and press shutter button once. 4. Turning the aperture dial and set the aperture value to F/64 and press shutter button once. The operation combination of F/64-shutter button+F57-shutter button +F/64-shutter button will activate the setting mode of the ring. 5. Turning the aperture dial, if the maximum aperture value can be set to F/1.0, your ring is now in setting mode. And you can begin to set the focal length, maximum aperture value and focus micro adjustment of your lens.
How enter values in setting mode? When you setting up the ring, you will need to enter some values. In setting mode, the ring interprets specified aperture values to numbers. The conversion rule is stated in the beneath chart:
The ring has 3 setting modes: Mode 0- enter your lens’ maximum aperture. Mode 1- enter your lens’ focal length. Mode 2- enter your lens’ focus micro adjustment. Turning the aperture dial to specific aperture value and press shutter button to enter a desired setting mode. For example, if you want to enter the lens’ maximum aperture, turn the aperture dial to F/2.0[which means Number 0 to the ring] and press shutter button. You are setting the ring in maximum aperture enter mode.
Entering the maximum aperture: 1. Turn the dial and set the aperture to F/2.0 and press shutter button to enter this mode. 2. Turn the dial and set the aperture to the actual maximum aperture of your lens and press shutter button. The maximum aperture will be registered in the ring. This emf adapter accepts aperture value ranging from F/1.1 to F/45.
Notice: Don't set the maximum to F/1.0. This value is reserved for engineering purpose and will not be accepted by the ring. Don't set the maximum aperture smaller than F/5.6. The focus detecting system of your digital camera might fail to function properly when a lens slower than F/5.6 is attached. Store the parameters to emf chip
Enter the lens focal length 1. Turn the dial and set the aperture to F/2.2 and press shutter button to enter this mode. 2. Focal length can be set from 1mm to 65535mm. The ring needs five numbers to store the focal length data. If the focal length of your lens is smaller than five digits, you need to insert zeros in front of actual numbers. Each time you choose a number, press shutter button to enter. Store the parameters to emf chip For one example, if your lens focal length of your lens is 50mm, you shall enter 00050, that will be a combination of operations: F/2.0-shutter + F/2.0-shutter + F/2.0-shutter + F/3.5-shutter + F/2.0-shutter
Enter the focus micro adjustment 1. Turn the dial and set the aperture to F/2.5 and press shutter button to enter this mode. emf chip accepts focus micro adjustment value, ranging from 0 to 31. The value is defined by two numbers. If the micro adjustment value of your lens is smaller than two numbers, you shall insert a zero in front of the actual number. Choose the desired number and press shutter button to enter the value one by one. Store the parameters to emf chip For example, if the micro adjustment value is 25, you shall enter F/2.5 - shutter button + F/3.5 – shutter button Notice: Please enter the micro adjustment value according to your own tests. The value shall not be entered based on calculation alone.
Store the parameters to emf chip When you are finished entering all the parameters of your lens, you shall store them in the ring for normal shooting. Here is how: Change the aperture value to F/57, press shutter button once. Change the aperture value to F/64, press shutter button once. Change the aperture value to F/57 again, press shutter once. If all the values you’ve entered are correct, the above three steps will store all the parameters you’ve just entered to the chip on emf chip. If you have miss some steps in the entering process or the value you’ve entered does not fit the value range requirement stated above, the ring will automatically exit setting up mode and no parameters will be stored in the ring. All the data stored in emf chip will not lost when camera is powered off. The default parameter settings of emf chip is 50mm F/1.4, please change the parameters according to your lens’ specifications.
Take care: 1. Don't touch the golden contact points of the circuit board of emf chip when attaching and detaching the ring to your lens and camera. 2. Don't use F/64-shutter + F/57- shutter + F/64 – shutter combination in normal shootings. This combination will set emf chip to setting up mode. If you unintentionally enter this mode, choose a aperture value between F/6.3 and F/51 and press shutter button once to exit.
Szervusz! Van, de Nikonra nem kell, ez Canon EOS-ra való. Ezen kívül Olympusra is létezik, én ahhoz nem értek. Az eredeti kifejlesztő honlapja: http://filmprocess.ru/oduvanchik/index.htm (Puskin nyelvén).
Az általános info:
Mi célt szolgál?
A Canon EOS fényképezőgépeken az autófókuszos objektív levétele után a vázban a pontos fókuszálást jelző jeladó blokkolásra kerül. A probléma megoldására szolgál az Emulátor.
Hogyan működik?
Ha a vázon nincs megfelelő kompatibilis objektív, akkor a fókuszálás jeladói blokkolódnak. Amikor a vázra adapter alkalmazásával manuális, nem eredeti objektívet helyezünk fel, akkor nem tudjuk használni ezt a kiváló funkciót, a pontos fókusz beállításának visszajelzését.
Mit csinál az Emulátor? Először is, az ön manuális objektívje adapter gyűrűjén helyezkedik el. Az objektív vázra történő felhelyezése során az Emulátor kapcsolatba kerül a váz bajonettjén lévő érintkezőkkel és feldolgozza a vázról érkező megkereséseket imitálva eredeti objektív jelenlétét. A váz felé közlésre kerül a „saját” objektív megléte és működésre való készenléte, valamint annak néhány paramétere. A fókusz jeladó aktiválásra kerül.
Az Emulátorba blende értéket és fókusz távolság értéket lehet beprogramozni. Ezeket az értékeket az exif-ből lehet olvasni, és ön meg fogja tudni határozni, hogy az adott felvétel milyen objektívvel készült. Például, ha ön Jupiter-9 objektívvel fényképez, akkor logikus lesz az Emulátorba 85 mm fókusztávolságot és 2,0 blendét programozni. Ezek az értékek semmiképpen nem hatnak a fénymérésre és a fókuszálás pontosságára. Egyetlen jelentőségük – jelezni az objektívet, amellyel a felvétel készült.
A jelenleg hirdetett emulátorba fix értéket programoztak, 1.4 / 50 értéket.
Kapható programozható emulátor is.
A felvétel készítés rendje az Emulátorral
• Tegye fel az objektívet az adapter gyűrűvel a vázra, • A vázon kapcsoljon az Av üzemmódra, • Állitson az objektíven valamilyen eléggé nyitott blendét (a különböző EOS vázak a teljesen nyitott értéktől kb. 8 blende értékig ismerik fel a fókuszálás megtörténtét), • Forgassa a fókuszáló gyűrűt az objektíven – a váz meg fogja erősíteni a pontos fókuszálást csipogással és pislogással, • Zárja a blendét a szükséges értékre (ha ez még szükséges) – ez után a váz meghatározza az expozícós idő értékét, • Exponáljon!
M42 – EOS peremes adapter, fókuszvisszajelzős chippel kapható Budapesten azonnal vagy belföldi elsőbbségi ajánlott levélben elküldve.
M42 manuál fókuszálású objektíveket Canon EOS vázra lehet vele feltenni, a fókuszált helyzetet a programozott (1.8/50-re, ez lesz az exif adatok között emlékeztetőnek feltüntetve) chip segítségével az EOS váz jelzi, gyakorlatilag a filmes és digitális vázak szinte mind működnek vele. Nagyon jól eltalált, alaposan kipróbált példány, peremes. Könnyűfém sötétre eloxálva. 5000 Ft. Masszív fém, fényes kivitel (nem alu). 5500 Ft. Chip (1.4/50 fix programozású) külön is kapható 3000 Ft-ért. Felragasztását kérésre ingyen elvégzem. Más adapterekre (pl. Psix, Y/C, Exa) is alkalmas.
Chip nélküli M42 - EOS adapter napokon belül szintén kapható lesz.
Y/C - EOS adapter chippel (2/50) 1 db van még, 7000 Ft.
EOS objektív hátsó sapkát +600 Ft-ért adhatok kérésre.
Lelassul? Hát ez fura, mármint a fókuszvisszajelzés kiértékelésén tököl vagy minden lassú lesz tőle? Mert ha ez utóbbi, akkor azt szerintem direkt csinálta a Canon.
Bár már egy jó ideje halott a topic, azért én mégis megkérdezem hogy van-e valakinek eladó EOS gépváz - nikon optika közé való átalakítója (lehetőleg emulátorral).
Még egy olyan kérdésem lenne hogy van-e valami ötlet hogy miért nem működik a 40D-vel az az emulátor ami a 350D-vel hibátlanul ment? Nagyon durván lelassul a gép ha rárakom.
Ez igaziból 2 kérdés: 1. Létezik-e Nikon-M42 átalakító? Igen létezik, csak az eltérő vázméretek miatt van benne egy lencse. Ha csak makrózol, akkor kiszedheted, de egyébként kell, mert különben nem lesz végtelened. További finomság, hogy külön átalakító van a széleslátószög és a tele tartományhoz. Itt: Nikon-M42 adapter 2. Létezik-e Nikon-bármi átalakítóra való Nikon obi emulátor? Lehet, én nem tudok róla.
Egyáltalán nem gyenge szöveg, akartam is venni konvertert (csak nikont kerestem, mert nikonnal használom), csak amikor kerestem 1,4-1,5*-özőt, akkor nem jelentkezett senki (gondolom, nem sok embernek van manuálishoz konvertere, af-es meg nekem felesleges).
Igen, akkor nem marad más, mint nekiesek méricskélni.